

This article contains affiliate links. If you purchase through one of our links, we may earn a commission at no extra cost to you. This does not influence which products we include or how they are ranked. For more options, browse our full Cookware & Bakeware collection.
You can usually fix a non-stick pan that stopped working right by removing invisible oil residue, gently reconditioning the coating, and correcting your heat and cleaning habits. Most pans feel sticky not because the coating is gone, but because polymerized oil and food film have built up and are masking the slick surface.
In the steps below you will learn how to deep clean without scratching the coating, how to revive glide with a light oiling, and which daily habits keep your pan slippery longer. If you are deciding whether to restore or replace, browse our guide to the best non-stick pans for everyday cooking to see what a fresh surface should feel like.
How to Restore a Non-Stick Pan Step by Step
Step 1: Give It a Proper Deep Clean
Start with warm water, a soft sponge, and a gentle cookware cleanser to lift greasy film that dish soap alone often leaves behind. Avoid steel wool or harsh scouring pads, they will scratch the coating and make sticking worse. Work in small circles, rinse thoroughly, and watch how water behaves, beading shows residue is gone while sheeting suggests film remains.
For stubborn buildup, make a light paste with cleanser and a little water, let it sit for about a minute, then lightly scrub and rinse. Never plunge a hot pan into cold water, thermal shock can warp the base and create hot spots. If the exterior looks dull or stained, the same gentle approach can brighten it, and you can learn more about durable alternatives in our best dutch oven picks for Bread, Braises, and everyday cooking when you need high heat performance.
Step 2: Dry Completely and Lightly Recondition
Dry the pan fully with a soft towel, then set it on low heat for 60 to 90 seconds to evaporate hidden moisture. Add about half a teaspoon of neutral oil with a high smoke point, such as canola or avocado, and rub it over the interior with a paper towel until only a sheer film remains. You want a whisper of oil, not a puddle that will burn.
Warm the oiled pan on low to medium low for another minute, then let it cool and wipe out any excess with a clean towel. This is not the same as seasoning cast iron, you are just filling micro texture and restoring glide. Skip butter or extra virgin olive oil for this step, they brown quickly and leave more residue that brings you back to square one.
Step 3: Correct Your Heat, Oil, and Utensil Habits
Non-stick coatings break down fastest under high heat. Preheat the pan on medium or medium low for a minute before adding oil or food, and never heat an empty pan on high. Use just enough oil to coat the surface, and avoid aerosol sprays that contain lecithin, they bake into a sticky varnish that is very hard to remove later.
Switch to silicone, wood, or nylon tools and avoid cutting food in the pan. Even small scratches create rough spots where eggs and fish cling. Let the pan cool slightly before washing and hand wash with a soft sponge instead of the dishwasher. For searing steaks or charring vegetables at high heat, consider a cast iron skillet for searing and campfire cooking so your non-stick pan does not have to do every job.
Step 4: Inspect the Coating Honestly
After cleaning and reconditioning, cook a simple item like an egg with a little oil to evaluate. If food still drags or sticks evenly across the whole surface, the coating may be worn thin. Look closely for visible scratches, peeling flakes, discoloration, or areas where the dark coating has worn to a lighter metal color.
Light, even wear can still be managed with the steps above, but deep scratches or flaking mean the non-stick layer is compromised. No amount of scrubbing will bring back the original glide once the coating is physically damaged. Knowing the difference saves you time and helps you decide when to keep cooking and when to retire the pan.
Supporting Product That Helps With This Fix
Quick Picks at a Glance
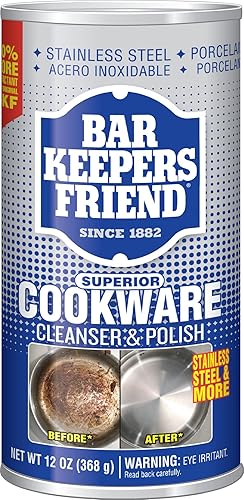
Prime Bar Keepers Friend Superior Cookware Cleanser
As an Amazon Associate we earn from qualifying purchases. Product prices and availability are accurate as of the date/time indicated.
Pros
- Exceptional power on burnt oil and carbon buildup
- Requires much less elbow grease than baking soda or vinegar soaks
- Safe for stainless steel, enameled cast iron and ceramic coated cookware when used as directed
- Proven to revive heavily stained and older pans
- Easy to use paste made with just water and a soft cloth
Cons
- Powder formula needs thorough rinsing to avoid residue
- Can be abrasive if used with steel wool or excessive pressure and may dull delicate finishes
- Not suitable for nonstick coatings and requires gentle technique
Bar Keepers Friend Superior Cookware Cleanser and Polish is a powder cleaner designed for stainless steel, enameled cast iron and ceramic coated cookware. It is made for home cooks, bakers and anyone dealing with discolored, stained or burnt on residue that regular dish soap cannot remove.
In real world use it excels at lifting carbonized oil, burnt food and brown patina with just water and a soft sponge or cloth. Users report it restores Dutch ovens blackened by high heat baking and revives decades old stainless steel pans without heavy scrubbing or harsh chemicals.
The product comes in a compact 12 ounce canister that is easy to store and dispense. The fine powder forms a smooth paste with a little water, giving you control over cleaning strength while remaining gentle enough for polished and coated surfaces when used as directed.
It does require thorough rinsing to avoid powdery residue and it can be abrasive if paired with steel wool or excessive pressure. It is also not suitable for nonstick coatings, so you will want to stick to soft tools and follow the instructions for delicate finishes.
Overall, this cleanser delivers impressive restoration power for the effort and is a smart staple for any kitchen. If you want to keep your cookware bright, clean and looking new without replacing it, this is a proven and reliable choice.
Product Dimensions: 7 x 3 x 3 inches, 11.99 ounces
Item Model Number: 11513
Manufacturer: Bar Keepers Friend
Category: Household Cleaning, Metal Polishes
Best Sellers Rank: Top rated in Metal Polishes
A gentle, non-scratch cleanser makes the deep clean step much more effective. The Bar Keepers Friend Superior Cookware Cleanser is designed to lift polymerized oil and burnt on film without harsh abrasion, so you can remove the invisible residue that causes sticking and let your light re-oiling actually restore glide.
When This Won’t Fix It
If your pan shows deep scratches, peeling or flaking coating, exposed bare metal, or a warped base that rocks on the burner, cleaning and reconditioning will not restore it. In those cases replace the pan and reserve high heat searing for stainless steel or cast iron instead.
Frequently Asked Questions
Why is my non-stick pan suddenly sticking even though it looks clean?
Most sudden sticking comes from a thin, invisible layer of polymerized oil, not food you can see. Cooking sprays, overheating oil, and washing with only light soap leave this film behind, and it turns sticky over time. A thorough clean with a gentle cookware cleanser followed by a very light re-oiling usually brings back the glide.
Can you re-season a non-stick pan to make it non-stick again in 2026?
You cannot season a non-stick pan like cast iron, but you can lightly recondition it. After a deep clean and full dry, rub in a tiny amount of neutral oil, warm it briefly on low heat, then wipe it almost dry. This fills micro texture and improves release, but it will not repair a coating that is scratched through or peeling.
How do I know when to replace my non-stick pan?
Replace the pan if you see flakes in your food, deep scratches you can feel with a fingernail, large discolored patches, or a base that wobbles and will not heat evenly. If only the surface feels slightly less slick but looks intact, try the cleaning and reconditioning steps first. Keep sharp tools away from the coating, and store pans with a soft protector, and see our guide to the best kitchen knives for prep that reduces the need to cut inside the pan.




Write Your Review
No reviews yet. Be the first to share your experience!